Marco Industries Logo
Search
Close this search box.

Python™ 150 Round Vent

With 150 square inches of Net Free Venting Area, the Python 150 Round Vent is ideal for larger roofs. It requires only a third of the roof penetrations of typical 50 NFVA vents, saving time and money. Made of high-impact polypropylene with heat stabilizers and UV inhibitors throughout, it will not rust or dent.

made-in-usa
CSA
CSA
TDI
Python™ 150 Round Vent

Learn More

The Python 150 Round Vent is suitable for any pitch from 2/12 to 16/12. Available in black, brown, and weatherwood, it can compliment any of today’s shingle color choices. The Python 150 Round Vent helps attics breath to keep cool and dry, reducing utility costs, preventing mold and mildew, extending shingle and roof-deck life, reducing air conditioning maintenance costs, and eliminating damaging ice dams in winter months.

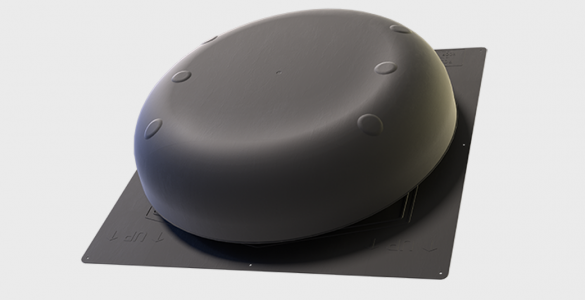
Net Free Venting Area: 150 square inches per piece
Dimensions: 26″ W x 26″ L x 6.97” H
Material: No-break polypropylene 
Codes & Standards: TDI, FL Building Code, CSA
Passed: Florida TAS 100 (A) Wind & Water 110 mph
Colors: Black, Brown, Weatherwood
Roof Pitch: Conforms to any pitch from 2/12 to 12/12
Patents: US Pat No. 7,544,124, US Pat No. 7,780,510, US Pat No. 10,415,252
Vent Weight: 4.34 lbs. per piece
Pack Unit of Measurement: 1 per carton
Construction Detail: Heat stabilizers and UV inhibitors throughout
Durability: Will not dent or rust, UL 2218: Class 4 Impact (hail) Resistant

How To Install

The Python 150 Round Vent has no sharp edges, making it safer to handle and install. It’s virtually indestructible, with no bending of the flange or denting of the dome, and it requires a simple square cutout.

Step 1

Locate the roof vents toward the rear or side of the house spaced evenly over the width of the roof.

Step 2

Mark the location of all roof vents before cutting holes. Center the holes between the rafters down at least two feet (24″) from the peak of the roof.

Step 3

Holes should be cut 17½” High x 15½” Wide. The Python 150 Round Vent box has a template for error proof installation. Using the template mark the outline for the hole on the roof. The hole in the roof cannot be larger than the hole in the bottom of the vent.

Step 4

Shingle up until shingles cover the bottom of the hole. Cut the excess shingles away. Because shingles are part of a porous system, applying an approved sealant around the edge of the hole is required.

Step 5

The top of the Python 150 Round Vent has a molded in peak. Ensure that the vents are installed with the peak at the UP position.

Step 6

Secure the vent base with a minimum of 8 galvanized nails. Nails should be a minimum of 1¼” long and must penetrate the vent, shingle, and decking. Secure a nail in each corner of the vent flashing and along the middle of each side of the vent.

Step 7

To seal the vent, use a plastic-friendly roofing sealant. All nails must also receive a dab of sealant.

Step 8

Shingle up and around the vent ensuring that the shingles butt up against the throat of the vent.

Step 9

Pre-cut the top shingle to fit around the cricket of the vent and nail in place. Shingle up as normal to complete installation.

More Ventilation

Learn about our other ventilation products featuring our exclusive nonwoven polyester material, for long-lasting resiliency, moisture prevention, and energy efficiency.

Resources

Dig deeper with ventilation calculators, FAQs, and glossaries.