Marco Industries Logo
Search
Close this search box.

Python™ FlexFit™ 3-in-1 Ridge Vent

The most innovative, field-adjustable ridge vent on the market converts from 12″ to 10″ or 9″ ridge vent by simply scoring the groove on the top of the vent. Made from durable, no-break polypropylene, it won’t rust or dent and closed external baffles make it less likely to collect debris resulting in diminished airflow.

CSA
CSA
TDI
made-in-usa
Python™ FlexFit™ 3-in-1 Ridge Vent

Learn More

The patented Python FlexFit 3-in-1 Ridge Vent is suitable for any roof pitch from 2/12 to 12/12 and provides a generous 84 square inches of Net Free Venting Area per piece. A vital piece for any shingled roof, the Python FlexFit 3-in-1 Ridge Vent helps attics breath to keep cool and dry, reducing utility costs, preventing mold and mildew, extending shingle and roof-deck life, reducing air conditioning maintenance costs, and eliminating damaging ice dams in winter months.

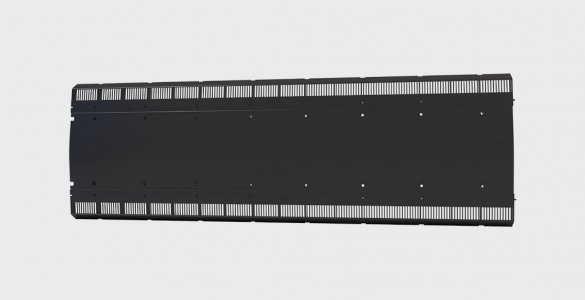
Net Free Venting Area: 84 square inches per piece
Dimensions: 15-1/2″ W x 48″ L
Material: No-break polypropylene 
Codes & Standards: TDI, FL Building Code, CSA
Color: Black
Nails: Bag of 30 – 3″ Nails
Roof Pitch: Conforms to any pitch from 2/12 to 12/12
Patents: US Pat No. 7,662,037, US Pat No. 9,175,480, US Pat No. D694,394, Canada Pat No. 2,776,653
Pack Unit of Measurement: 10 per carton
Shingle Cap Sizes: Converts from a standard 12″ to 10″ or 9″ ridge vent
Construction Detail: Closed external baffles with self-closing end caps.
Installer Detail: Shingle nail lines for easy installation
Nail Holes: Reinforced to prevent deformation and crushing
Approvals: FBC FL38704, TDI RV-125

How To Install

Designed with built-in self-closing end caps and self-aligning male/female connectors, the Python FlexFit 3-in-1 Ridge Vent is easy to install. Each piece includes a 30-count bag of 3″ roofing nails for installation.

Step 1

Using a chalk line, mark 1″ on both sides of the ridge (1″ beyond ridge pole) as a guide for cutting a slot in the decking.

Step 2

Cut a slot in the roof ridge using a circular saw with the blade set at a depth to cut through the roof decking only (avoid cutting trusses and rafters).

Step 3

Center the Python FlexFit 3-in-1 Ridge Vent over the slot that has been cut in the ridge, ensuring that the ridge vent support pegs sit flat on the roof. To ensure proper alignment along the ridge, run a chalk line down both sides of the ridge.

Step 4

Using roofing nails provided, install the vent starting from the outer edge moving inward. Properly secure by using the 12″ nail holes.

Step 5

As you install more pieces of the ridge vent, ensure that each piece is joined together using the male/female connectors.

Step 6

Cut the final piece to a length long enough so that it is flush with the edge of the roof. Ensure that the self-closed end cap is facing out to prevent weather infiltration. (Interlocking feature will not be used on the final piece.)

Step 7

Install the cap shingles using the nails provided in the “shingle nail line” area for cap shingle installation as indicated on the Python FlexFit 3-in-1 Ridge Vent. See installation instructions for field adjustment to 9 inch and 10 inch sizes

More Ventilation

Learn about our other ventilation products featuring our exclusive nonwoven polyester material, for long-lasting resiliency, moisture prevention, and energy efficiency.

Resources

Dig deeper with ventilation calculators, FAQs, and glossaries.